概述
spring cloud是基于spring boot开发的微服务框架的典范,在微服务领域同样也有dubbo,初步从网上查了一下,dubbo在功能上可以认为是spring cloud的一个子集,另外spring cloud使用的是http的协议进行的服务调用,而dubbo使用的rpc的协议进行的服务调用。本次主要针对spring cloud中的功能模块的学习进行总结。
详解
服务注册与发现
spring cloud的服务注册与发现有多种可能的实现,比较常见的可以是eureka server,使用和配置的过程如下:
1
2
3
4
5
6
7
8
9
10
11
12
13
14
15
16
17
18
19
20
21
22
23
24
25
26
27
28
| <dependencies>
<dependency>
<groupId>junit</groupId>
<artifactId>junit</artifactId>
<version>4.11</version>
<scope>test</scope>
</dependency>
<dependency>
<groupId>org.springframework.boot</groupId>
<artifactId>spring-boot-starter-test</artifactId>
<version>1.3.5.RELEASE</version>
</dependency>
<dependency>
<groupId>org.springframework.cloud</groupId>
<artifactId>spring-cloud-starter-eureka-server</artifactId>
</dependency>
</dependencies>
<dependencyManagement>
<dependencies>
<dependency>
<groupId>org.springframework.cloud</groupId>
<artifactId>spring-cloud-dependencies</artifactId>
<version>Brixton.RELEASE</version>
<type>pom</type>
<scope>import</scope>
</dependency>
</dependencies>
</dependencyManagement>
|
这里引入了eureka-server以来,就是用来实现服务注册中心的,接下来我们启动一个web应用,并加上@EnableEurekaServer注解:
1
2
3
4
5
6
7
8
9
10
11
12
13
14
15
16
| import org.springframework.boot.autoconfigure.SpringBootApplication;
import org.springframework.boot.builder.SpringApplicationBuilder;
import org.springframework.cloud.netflix.eureka.server.EnableEurekaServer;
/**
* Hello world!
*/
@EnableEurekaServer
@SpringBootApplication
public class RegisterCenter {
public static void main(String[] args) {
new SpringApplicationBuilder(RegisterCenter.class).web(true).run(args);
}
}
|
最后,我们指定配置文件如下:
1
2
3
4
| server.port=1111
eureka.client.register-with-eureka=false
eureka.client.fetch-registry=false
eureka.client.serviceUrl.defaultZone=http://localhost:${server.port}/eureka
|
启动服务我们可以看到对应的页面如下:
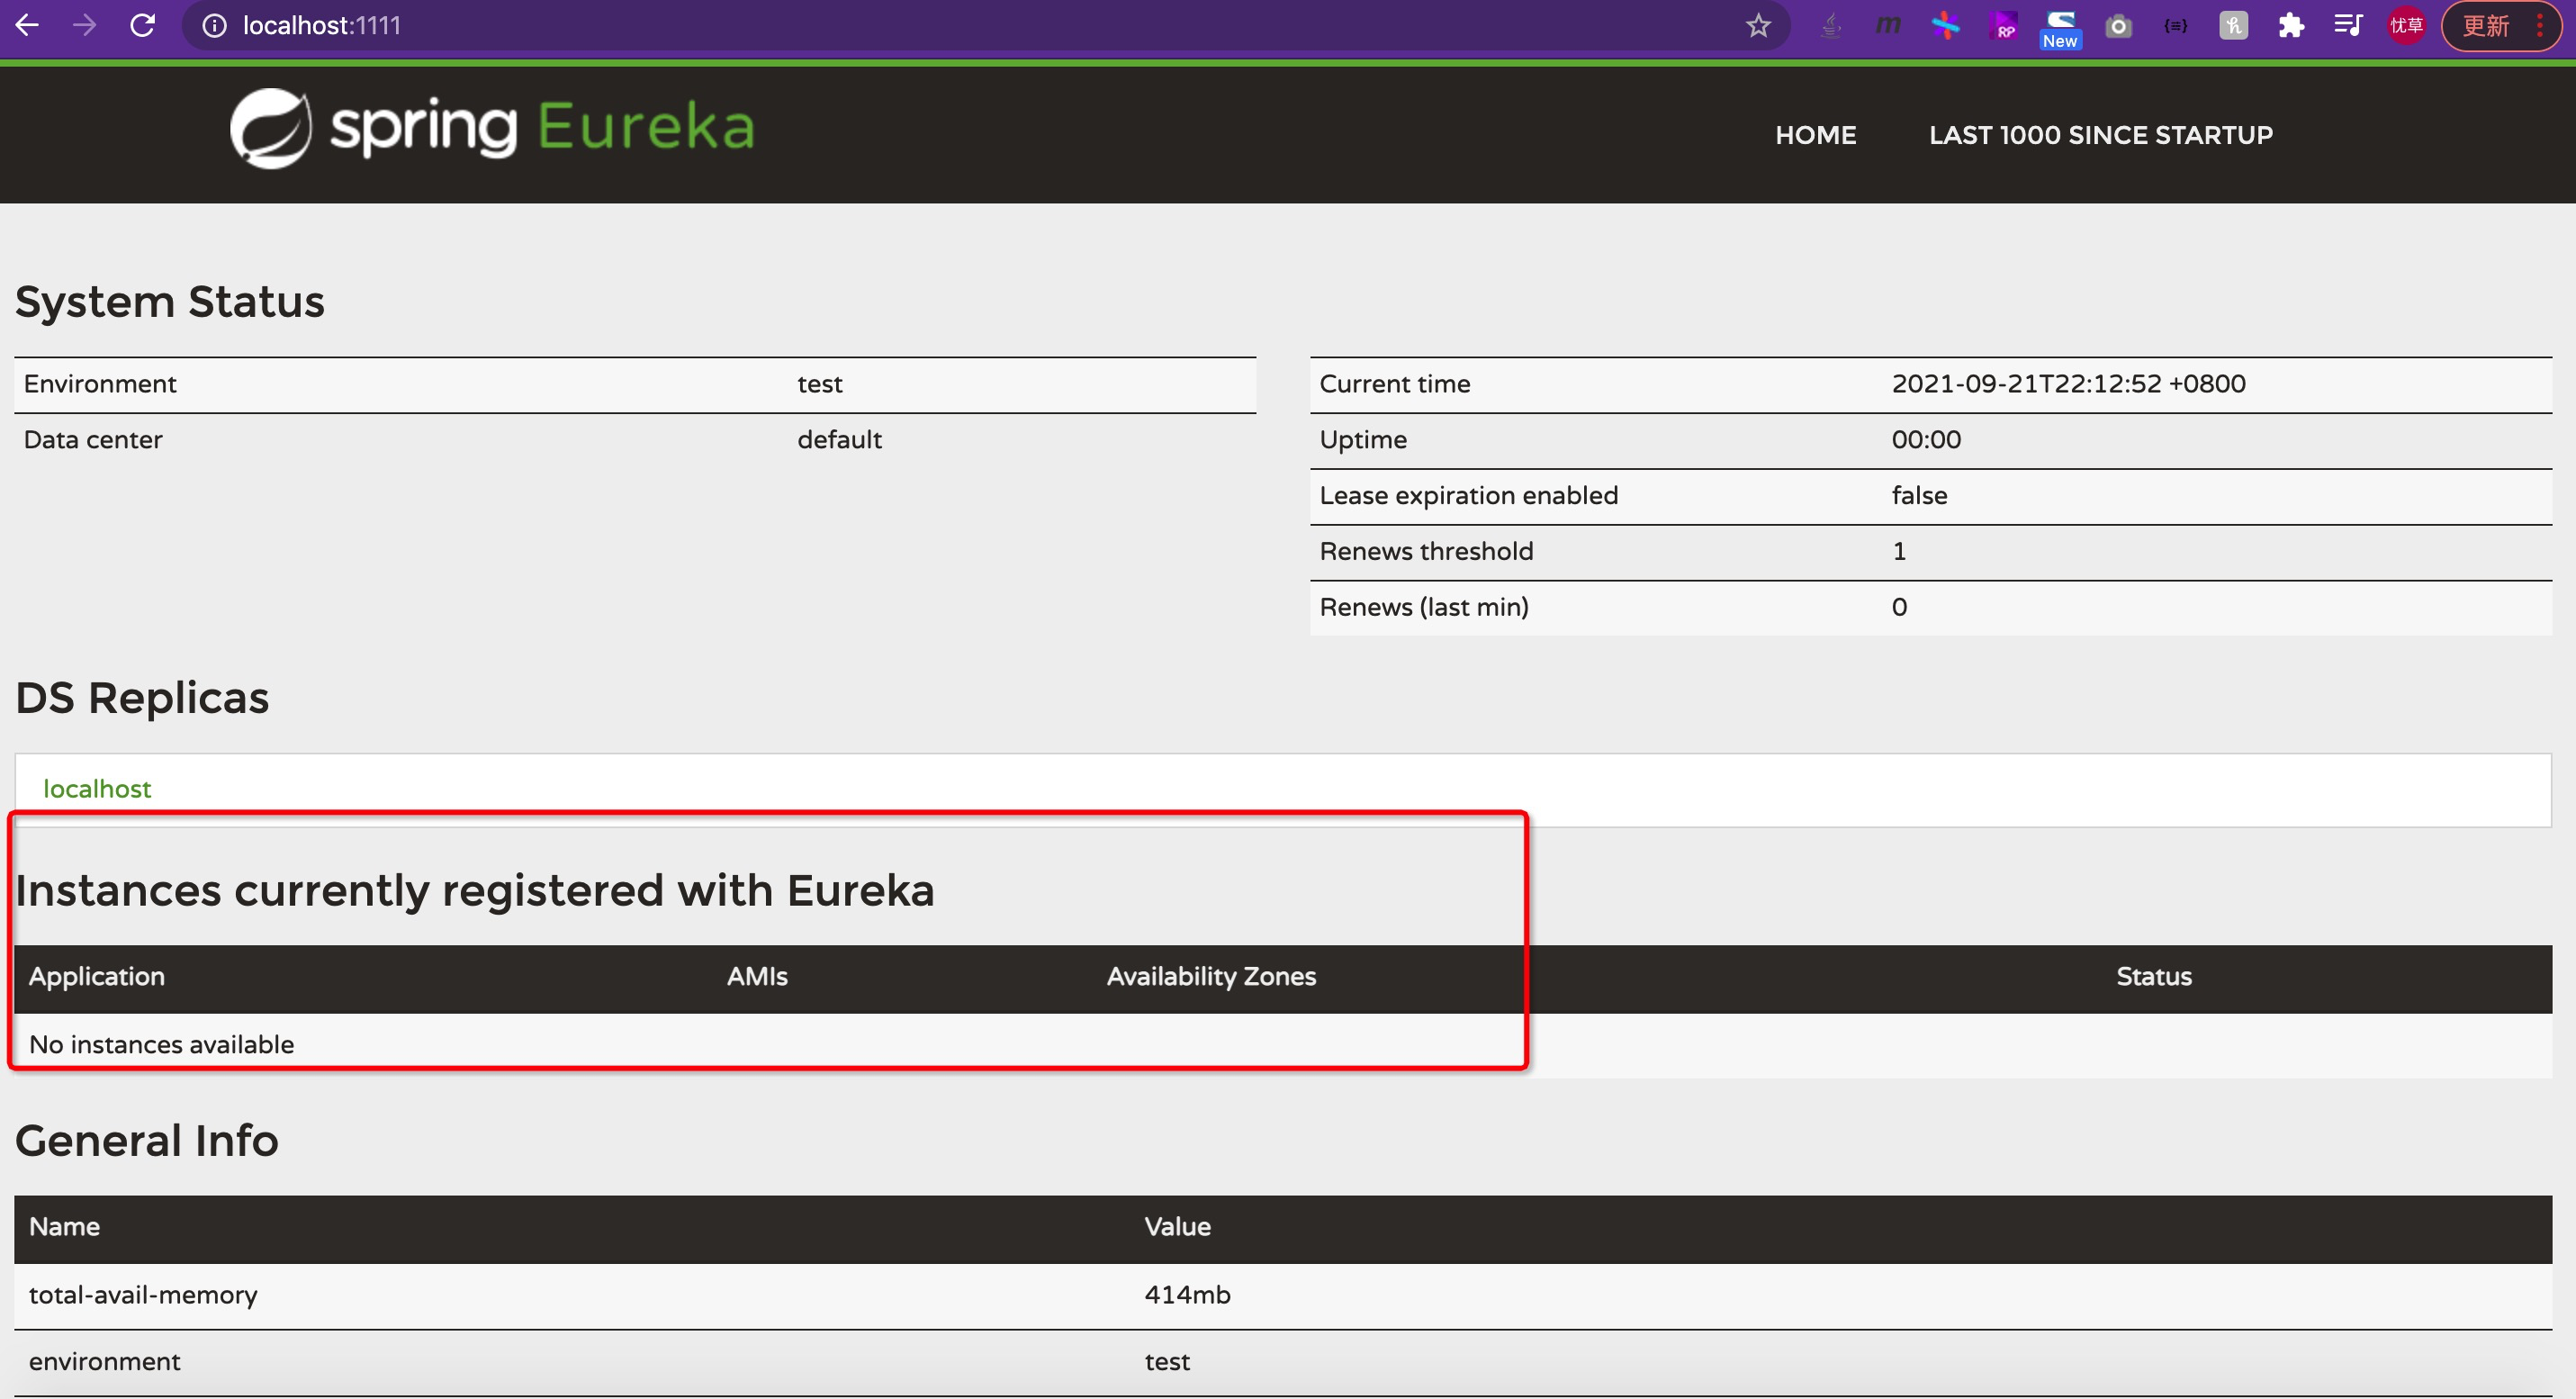
上图中红框标出来的就是在该注册中心中的对应的服务的实例。通常情况下我们可以构建高可用的服务注册中心,并且也可以选择zookeeper等作为服务注册中心(zk是cp的注册中心,eureka是ap的注册中心,通常枪框下我们的注册中心不可用不应该影响服务的可用状态,因此eureka在某种程度上更适合作为注册中心)。
断路器
在微服务架构中,我们将系统拆分成一个一个的微服务,如果一个服务出现故障,就可能会因为服务的依赖传递蔓延到整个系统中,因此产生了断路器模式,spring cloud 使用了Netflix hystrix来实现断路器的功能。我们创建几个微服务,来分别实现一定的功能。引入pom文件如下:
1
2
3
4
5
6
7
8
9
10
11
12
13
14
15
16
17
18
19
20
21
22
23
24
25
26
27
28
29
30
31
32
33
34
35
36
37
38
39
40
41
42
43
44
45
46
47
48
49
50
51
52
53
54
55
56
57
58
59
60
61
62
63
64
65
66
67
68
69
70
71
72
73
74
| <dependencies>
<dependency>
<groupId>junit</groupId>
<artifactId>junit</artifactId>
<version>4.11</version>
<scope>test</scope>
</dependency>
<dependency>
<groupId>org.springframework.boot</groupId>
<artifactId>spring-boot-starter-test</artifactId>
<version>1.3.5.RELEASE</version>
</dependency>
<dependency>
<groupId>org.springframework.cloud</groupId>
<artifactId>spring-cloud-starter-eureka</artifactId>
<exclusions>
<exclusion>
<groupId>com.fasterxml.jackson.core</groupId>
<artifactId>jackson-databind</artifactId>
</exclusion>
<exclusion>
<groupId>com.fasterxml.jackson.core</groupId>
<artifactId>jackson-core</artifactId>
</exclusion>
</exclusions>
</dependency>
<dependency>
<groupId>com.fasterxml.jackson.core</groupId>
<artifactId>jackson-databind</artifactId>
<version>2.9.8</version>
</dependency>
<dependency>
<groupId>com.fasterxml.jackson.core</groupId>
<artifactId>jackson-core</artifactId>
<version>2.9.8</version>
</dependency>
<dependency>
<groupId>org.springframework.cloud</groupId>
<artifactId>spring-cloud-starter-ribbon</artifactId>
</dependency>
<dependency>
<groupId>org.springframework.boot</groupId>
<artifactId>spring-boot-starter-web</artifactId>
<version>1.3.5.RELEASE</version>
</dependency>
<dependency>
<groupId>org.springframework.cloud</groupId>
<artifactId>spring-cloud-starter-hystrix</artifactId>
</dependency>
<dependency>
<groupId>org.springframework.cloud</groupId>
<artifactId>spring-cloud-starter-feign</artifactId>
</dependency>
<dependency>
<groupId>org.springframework.cloud</groupId>
<artifactId>spring-cloud-starter-config</artifactId>
</dependency>
<dependency>
<groupId>org.springframework.cloud</groupId>
<artifactId>spring-cloud-starter-zipkin</artifactId>
</dependency>
</dependencies>
<dependencyManagement>
<dependencies>
<dependency>
<groupId>org.springframework.cloud</groupId>
<artifactId>spring-cloud-dependencies</artifactId>
<version>Brixton.RELEASE</version>
<type>pom</type>
<scope>import</scope>
</dependency>
</dependencies>
</dependencyManagement>
|
在应用的启动类上面加上@EnableCircuitBreaker注解来开启断路器的功能,接下来需要在调用方的函数上增加@HystrixCommand(fallbackMethod = "fallbackAdd")注解,这种方式可以直接制定回落的方法,不过更好的一种方法其实是实现指定的接口,在接口中完善回落方法,正常情况下请求是通过代理完成服务的调用,当调用失败的时候将会调用对应类的对应方法。如下:
1
2
3
4
5
6
7
8
9
10
11
12
| import org.springframework.cloud.netflix.feign.FeignClient;
import org.springframework.web.bind.annotation.RequestMapping;
import org.springframework.web.bind.annotation.RequestMethod;
import org.springframework.web.bind.annotation.RequestParam;
import springcloud.service.fallback.ConsumerServiceImpl;
@FeignClient(value = "compute-service", fallback = ConsumerServiceImpl.class)
public interface ConsumerService {
@RequestMapping(value = "/add", method = RequestMethod.GET)
String add(@RequestParam("a") Integer a, @RequestParam("b") Integer b);
}
|
上面我们在feignclient注解上指定了fallback的实现类,对应的具体实现如下:
1
2
3
4
5
6
7
8
9
10
| import org.springframework.stereotype.Component;
import springcloud.service.ConsumerService;
@Component
public class ConsumerServiceImpl implements ConsumerService {
@Override
public String add(Integer a, Integer b) {
return "something wrong";
}
}
|
这样当我们请求服务失败的时候就会直接跳转到该实现类的方法上。
分布式配置
一半的公司都会实现配置中心,类似于CMDB的一个功能,用来给各个服务提供统一的配置中心,好处的话自然是可以在多个系统中维护一份配置信息,在spring cloud中也有类似的功能框架spring cloud config,spring cloud config基于应用、版本、环境来管理配置信息,并支持git,也就是我们可以通过git来实现配置信息的管理,接下来我们引入依赖,并配置相关的信息:
1
2
3
4
5
6
7
8
9
10
11
12
13
14
15
16
17
18
19
20
21
22
23
24
25
26
27
28
| <dependencies>
<dependency>
<groupId>junit</groupId>
<artifactId>junit</artifactId>
<version>4.11</version>
<scope>test</scope>
</dependency>
<dependency>
<groupId>org.springframework.boot</groupId>
<artifactId>spring-boot-starter-test</artifactId>
<version>1.3.5.RELEASE</version>
</dependency>
<dependency>
<groupId>org.springframework.cloud</groupId>
<artifactId>spring-cloud-config-server</artifactId>
</dependency>
</dependencies>
<dependencyManagement>
<dependencies>
<dependency>
<groupId>org.springframework.cloud</groupId>
<artifactId>spring-cloud-dependencies</artifactId>
<version>Brixton.RELEASE</version>
<type>pom</type>
<scope>import</scope>
</dependency>
</dependencies>
</dependencyManagement>
|
创建应用入口,并通过@EnableConfigServer开启配置服务:
1
2
3
4
5
6
7
8
9
10
11
12
13
14
15
16
17
18
| import org.springframework.boot.autoconfigure.SpringBootApplication;
import org.springframework.boot.builder.SpringApplicationBuilder;
import org.springframework.cloud.config.server.EnableConfigServer;
@SpringBootApplication
@EnableConfigServer
public class ConfigApplication {
public static void main(String[] args) {
new SpringApplicationBuilder(ConfigApplication.class).web(true).run(args);
}
}
|
配置服务的信息,并指定配置的地址等信息:
1
2
3
4
5
6
7
| spring.application.name=config-server
server.port=7001
# 这里的key值是uri,不是url
spring.cloud.config.server.git.uri=https://github.com/southrivers/spring-cloud-config.git
spring.cloud.config.server.git.searchPaths=repo
spring.cloud.config.username=username
spring.cloud.config.password=xxxxxxx
|
最后启动服务就可以从git上拉取配置信息。
服务网关
我们一般使用nginx来实现负载均衡,在某种程度上nginx像是服务的网关,那为什么还要再再spring cloud中多引入一个网关的功能呢?我们知道微服务一般是无状态的,也就是说我们的权限等相关的信息不应该放在每一个微服务上,如果放到各个服务上,权限相关的代码看起来必定不是很清爽,因此我们引入了Netflix zuul作为服务的网关,该组建出了具备路由、负载均衡之外还具备权限控制的功能,这样我们就可以将权限相关的控制逻辑转移到这里,并使得微服务代码具备更高的可服用以及可测试性。引入如下依赖:
1
2
3
4
5
6
7
8
9
10
11
12
13
14
15
16
17
18
19
20
21
22
23
24
25
26
27
28
29
30
31
32
33
34
35
36
37
38
39
40
41
42
43
44
45
46
47
48
49
50
51
52
53
| <dependencies>
<dependency>
<groupId>junit</groupId>
<artifactId>junit</artifactId>
<version>4.11</version>
<scope>test</scope>
</dependency>
<dependency>
<groupId>org.springframework.boot</groupId>
<artifactId>spring-boot-starter-test</artifactId>
<version>1.3.5.RELEASE</version>
</dependency>
<dependency>
<groupId>org.springframework.cloud</groupId>
<artifactId>spring-cloud-starter-eureka</artifactId>
<exclusions>
<exclusion>
<groupId>com.fasterxml.jackson.core</groupId>
<artifactId>jackson-databind</artifactId>
</exclusion>
<exclusion>
<groupId>com.fasterxml.jackson.core</groupId>
<artifactId>jackson-core</artifactId>
</exclusion>
</exclusions>
</dependency>
<dependency>
<groupId>org.springframework.cloud</groupId>
<artifactId>spring-cloud-starter-zuul</artifactId>
</dependency>
<dependency>
<groupId>com.fasterxml.jackson.core</groupId>
<artifactId>jackson-databind</artifactId>
<version>2.9.8</version>
</dependency>
<dependency>
<groupId>com.fasterxml.jackson.core</groupId>
<artifactId>jackson-core</artifactId>
<version>2.9.8</version>
</dependency>
</dependencies>
<dependencyManagement>
<dependencies>
<dependency>
<groupId>org.springframework.cloud</groupId>
<artifactId>spring-cloud-dependencies</artifactId>
<version>Brixton.RELEASE</version>
<type>pom</type>
<scope>import</scope>
</dependency>
</dependencies>
</dependencyManagement>
|
创建应用入口并使用@EnableZuulProxy开启zuul:
1
2
3
4
5
6
7
8
9
10
11
12
13
14
15
16
17
| import org.springframework.boot.builder.SpringApplicationBuilder;
import org.springframework.cloud.client.SpringCloudApplication;
import org.springframework.cloud.netflix.zuul.EnableZuulProxy;
@EnableZuulProxy
@SpringCloudApplication
public class Gateway {
public static void main(String[] args) {
new SpringApplicationBuilder(Gateway.class).web(true).run(args);
}
}
|
最后增加配置信息:
1
2
3
4
5
6
7
8
9
10
11
12
| spring.application.name=gateway
server.port=11000
zuul.routes.api-a.path=/api-a/**
zuul.routes.api-a.serviceId=COMPUTE-SERVICE
zuul.routes.api-b.path=/api-b/**
zuul.routes.api-b.serviceId=CONSUMER-SERVICE
eureka.instance.hostname=localhost
# 这里一定要是true才可以,否则会报forword error的错误
eureka.client.fetch-registry=true
eureka.client.serviceUrl.defaultZone=http://localhost:1111/eureka
|
如上,我们在配置信息中指定路由的url前缀匹配的服务,并配置在服务启动的时候就获取相应的配置信息。这样所有的请求将会通过zuul转发到对应的服务。
调用链追踪
在分布式的微服务中,如果服务间的依赖比较复杂,是需要分析服务间的调用关系及相互影响的,也就是我们常说的调用链分析,在spring cloud中有比较成熟的调用链分析技术:sleuth,其本质是zipkin client的一个封装,首先我们需要启动一个zipkin server:
1
2
3
4
5
6
7
8
9
10
11
12
13
14
15
16
17
18
19
20
21
22
23
24
25
26
27
28
29
30
31
32
33
34
| <dependencies>
<dependency>
<groupId>junit</groupId>
<artifactId>junit</artifactId>
<version>4.11</version>
<scope>test</scope>
</dependency>
<dependency>
<groupId>org.springframework.cloud</groupId>
<artifactId>spring-cloud-starter-config</artifactId>
</dependency>
<dependency>
<groupId>io.zipkin.java</groupId>
<artifactId>zipkin-server</artifactId>
</dependency>
<dependency>
<groupId>io.zipkin.java</groupId>
<artifactId>zipkin-autoconfigure-ui</artifactId>
<scope>runtime</scope>
</dependency>
</dependencies>
<dependencyManagement>
<dependencies>
<dependency>
<groupId>org.springframework.cloud</groupId>
<artifactId>spring-cloud-dependencies</artifactId>
<version>Edgware.SR2</version>
<type>pom</type>
<scope>import</scope>
</dependency>
</dependencies>
</dependencyManagement>
|
接下来我们通过注解@EnableZipkinServer来开启zipkin server
1
2
3
4
5
6
7
8
9
10
11
12
13
14
15
| import org.springframework.boot.SpringApplication;
import org.springframework.boot.autoconfigure.SpringBootApplication;
import zipkin.server.EnableZipkinServer;
/**
* Hello world!
*/
@SpringBootApplication
@EnableZipkinServer
public class ZipkinServer {
public static void main(String[] args) {
SpringApplication.run(ZipkinServer.class, args);
}
}
|
最后指定服务的配置信息:
接下来我们只需要在对应的服务中引入相应的依赖:
1
2
3
4
| <dependency>
<groupId>org.springframework.cloud</groupId>
<artifactId>spring-cloud-starter-zipkin</artifactId>
</dependency>
|
就可以在服务调用的时候像zipkin server注册相应的信息了,对应结果如下:
小结
时间仓促,对应的实现原理还没有来得及分析,stream也没有补充(stream是服务总线,可以实现各个服务对某一事件的订阅,从而达到对应服务统一更新配置信息等相关功能),对应的完整代码地址如下:git地址,后续有时间的话继续完善。
1
2
3
4
5
6
7
8
9
10
11
12
13
14
15
16
17
18
19
20
21
22
23
24
25
26
27
28
29
30
31
32
33
34
35
36
37
38
39
40
41
42
43
44
45
46
47
48
49
50
51
52
53
54
55
56
57
58
59
60
61
62
| class Solution {
int[] dp;
public int coinChange(int[] coins, int amount) {
dp = new int[amount+1];
Arrays.fill(dp,-6);
return dd(coins,amount);
}
public int dd(int[] coins,int amount){
if(amount<0) return -1;
if(amount==0) return 0;
if(dp[amount]!=-6) return dp[amount];
int res=Integer.MAX_VALUE,g=0;
for(int f:coins){
g=dd(coins,amount-f);
if(g==-1) continue;
res=Math.min(res,g+1);
}
dp[amount]=res==Integer.MAX_VALUE?-1:res;
return dp[amount];
}
}
int[] tmp;
public int coinChange(int[] coins, int amount) {
if (amount < 0) {
return -1;
}
tmp = new int[amount + 1];
Arrays.fill(tmp, -666);
return help(coins, amount);
}
int help(int[] coins, int amount) {
if (amount == 0) {
return 0;
}
if (amount < 0) {
return -1;
}
if (tmp[amount] != -666)
return tmp[amount];
int res = Integer.MAX_VALUE;
for (int coin : coins) {
int subProblem = coinChange(coins, amount-coin);
if (subProblem < 0) {
continue;
}
res = Math.min(res, subProblem + 1);
}
tmp[amount] = (res == Integer.MAX_VALUE) ? -1 : res;
return tmp[amount];
}
作者:priate1
链接:https://leetcode-cn.com/problems/coin-change/solution/java-dong-tai-gui-hua-by-priate1-jn3d/
来源:力扣(LeetCode)
著作权归作者所有。商业转载请联系作者获得授权,非商业转载请注明出处。
|
